Imagine transforming complex infrastructure management into a streamlined, code-driven process, this is the power of Infrastructure as Code (IaC) with AWS CloudFormation and CDK. In this article, we will explore in depth what Infrastructure as Code (IaC) is and how it is transforming IT infrastructure management through automation and coding. We’ll explore in detail the AWS tools, such as AWS CloudFormation and AWS Cloud Development Kit (CDK), that make it easy to deploy and manage IaC. In addition, we will demonstrate step-by-step how to create an API using IaC with AWS, providing a practical guide to get the most out of these technologies and optimise the processes of deploying and managing cloud resources.
What is Infrastructure as Code (IaC)?
Infrastructure as Code (IaC) is a modern approach to managing and provisioning computing infrastructure through machine-readable scripts and configuration files, rather than through physical hardware or manual processes. This method allows developers to define and manage infrastructure using code, making it possible to automate the entire lifecycle of infrastructure deployment, scaling, and decommissioning.
In an integration context, you may find Integration Platform as a Service (iPaaS) solutions to be more suitable for scenarios where orchestration and integration with different external applications are required without extensive customisation of infrastructure. However, where frequent changes to infrastructure are required, or where infrastructure needs to be deployed and managed at scale, IaC offers numerous advantages.
Infrastructure as Code (IaC) Benefits
Infrastructure as code has multiple features that benefit developers and businesses. Here are 4 of the main benefits of Infrastructure as Code (IaC):
- Version control: IaC enables versioning of infrastructure configurations, similar to software code. This allows teams to track changes, roll-back to previous versions if necessary, and collaborate more effectively using tools like Git.
- Repeatability: With IaC, the same configuration can be applied consistently across different environments (development, testing, production), ensuring that they are identical. This repeatability reduces the risk of configuration drift and ensures stability and reliability.
- Efficiency: Automating the process of provisioning infrastructure reduces the time and effort required to set up environments and deploy and manage resources, in addition to minimising human error. In turn, this frees up resources and enables developers to spend more time on less mundane tasks.
- Disaster recovery: In the event of failures or outages, infrastructure can be quickly redeployed, significantly reducing downtime.
AWS offers robust tools for implementing Infrastructure as Code, notably AWS CloudFormation and the AWS Cloud Development Kit (CDK).
What is AWS Cloudformation?
AWS CloudFormation automates the provisioning and configuration of resources, ensuring consistent and repeatable setups. It enables the management of dependencies between resources and automatic rollback of changes if errors occur during the deployment process, ensuring stability while reducing manual intervention. This approach provides structure and reusability but involves significant boilerplate code for more complex setups.
AWS CloudFormation as a solution is concerned with two key entities:
- Template: A CloudFormation template is a JSON or YAML-formatted text file that users use to define AWS resources
- Stacks: In CloudFormation, all resources are created as a single unit called a stack. For example, a web application might be created as a single stack through one template, or separate stacks could be used for the network and backend.
What is AWS CDK?
AWS Cloud Development Kit (CDK) is an open-source software development framework for defining cloud infrastructure using modern programming languages such as TypeScript, JavaScript, Python, Java, C#, and Go. It leverages AWS CloudFormation to provision and deploy the infrastructure you define in your CDK app through the CDK toolkit.
AWS CDK Benefits
Benefits of AWS CDK include:
- Efficiency: What could take 500+ lines in CloudFormation can be achieved in as little as 15 lines of code in some cases through the use of the AWS Construct Library
- Developer-centric: Use existing programming languages to build CDK code
- Combines application and infrastructure code: Increases reliability and scalability by ensuring application and environment are versioned, tested and deployed together
- High-level constructs for speed and reusability: The AWS CDK includes an extensive library of constructs called the AWS Construct Library, which can be easily reused to expedite development
Creating an API using IaC with AWS
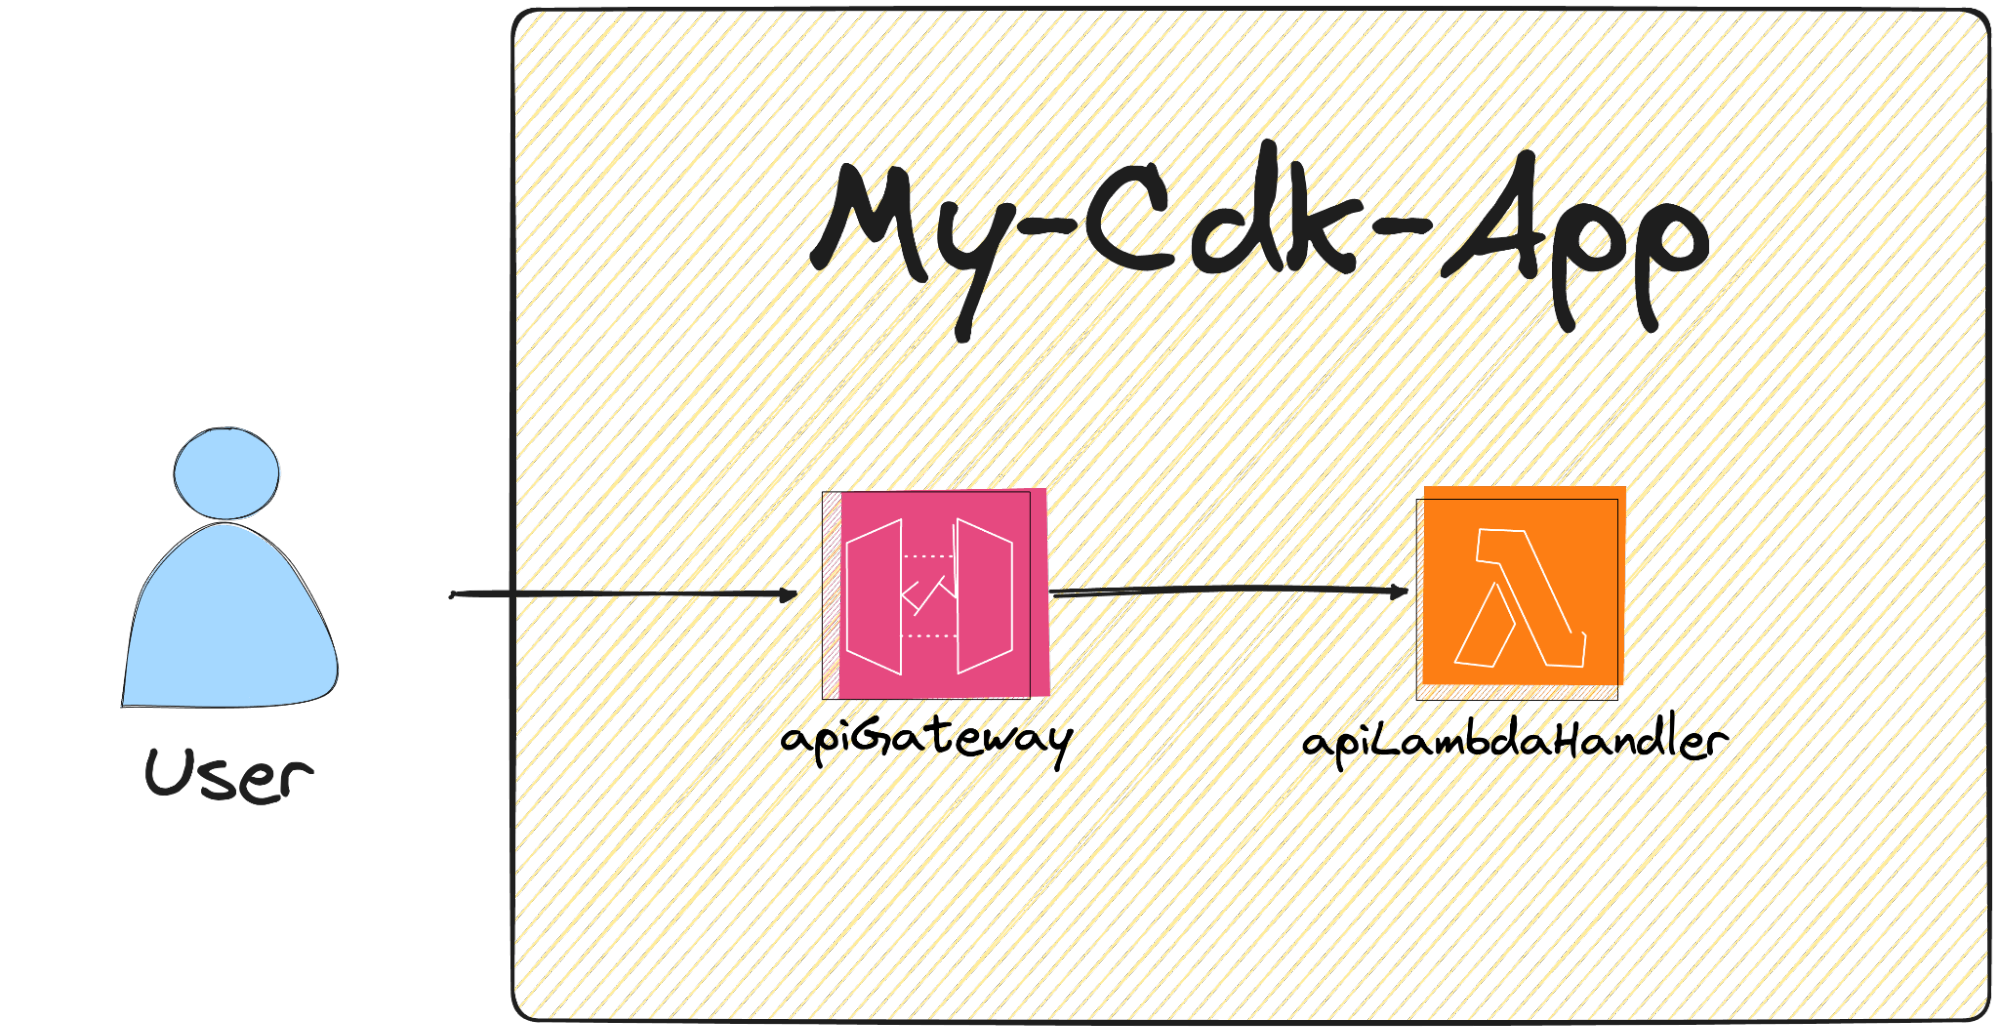
This tutorial demonstrates how to create and deploy a simple application on AWS using the AWS CDK. The application consists of an API Gateway instance and a Lambda function. The function will be invoked through API Gateway, before surfacing a response back to the end-user.
Prerequisites: This tutorial assumes you have Node.js, Typescript and the AWS CDK and CLI setup with valid credentials. If not, please follow this starter guide before resuming: https://docs.aws.amazon.com/cdk/v2/guide/getting_started.html
Having completed this tutorial, you will have:
- Created a CDK project using the AWS CLI cdk init command
- Used constructs from the AWS Construct Library to define, configure, and integrate your resources
- Used the CLI to build your app and deploy your CDK stack
- Interacted with your deployed application via the terminal
- Deleted your CDK stack using the CDK CLI cdk destroy command
Creating your CDK project
First, you need to create a new CDK project. A CDK project should be in its own directory, with its own local module dependencies.
To create a CDK project:
- From a starting directory of your choice, create and navigate to a directory named my-cdk using the following command: mkdir my-cdk && cd my-cdk
- From the my-cdk directory, initialise a new CDK project using the AWS CDK CLI cdk init command. Specify the app template and typescript language with the –language option using the following command: cdk init app –language typescript
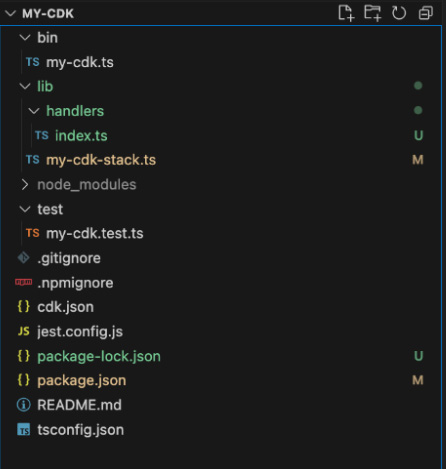
The cdk init command creates a structure of files and folders within the my-cdk directory to help organise the source code for your CDK app. This structure of files and folders is called your CDK project. Take a moment to explore your CDK project. It should look something like this:
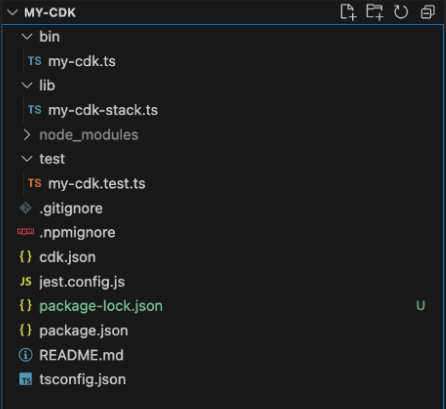
The purpose of each file within your project is broken down below:
- bin/my-cdk.ts: The entry point for the CDK application, this file defines which stack(s) to deploy. It also imports the stack defined in lib/my-cdk-stack.ts and instantiates it.
- lib/my-cdk-stack.ts: Contains the definition of your stack, in addition to specifying the AWS resources to create and their configuration
- test/my-cdk.test.ts: Contains unit tests for your CDK stack and uses the AWS CDK assertions library to test the synthesised CloudFormation template
- .gitignore: Specifies files and directories that should be ignored by Git, such as node_modules, build artifacts, and environment-specific files
- .npmignore: Specifies files and directories that should be ignored when publishing the package to npm
- cdk.json: Configures the CDK Toolkit (CDK command line tool) with information about your app, and specifies how to run the app
- jest.config.js: Configuration file for Jest, the testing framework used for unit tests
- package.json: Manages the dependencies and scripts for your CDK project, holds metadata about the project, and defines project scripts for building, testing, and deploying the CDK app
- package-lock.json: Automatically generated file that locks the versions of the project’s dependencies, it ensures that installations are consistent across different environments while providing a detailed description of the dependency tree
- README.md: Contains information about your project, such as instructions for setup and usage. This is to be populated by the developer themselves.
- tsconfig.json: Configuration file for TypeScript compiler options, this specifies settings such as the target JavaScript version and the directories to include/exclude
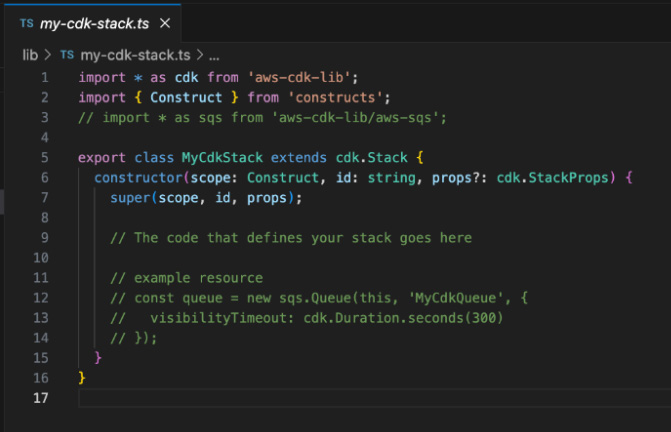
Defining your resources
During project initialization, the CLI creates a CDK app containing a single CDK stack. The CDK app instance is created using the App construct. The following is a portion of the default script from your CDK application file, located in lib/my-cdk-stack.ts:
This is where you will define resources for your stack, the first of which will be a Lambda function to be invoked by your API using this function construct from the CDK docs:
https://docs.aws.amazon.com/cdk/api/v2/docs/aws-cdk-lib.aws_lambda.Function.html
1. First, import Lambda constructs by adding the line of code below to the top of our script
import * as lambda from "aws-cdk-lib/aws-lambda";
2. Next, create a function for your API called apiLambdaFunction
const apiLambdaFunction = new lambda.Function(this, "ApiFunctionId", {

     runtime: lambda.Runtime.NODEJS_18_X,

     handler: "index.handler",

     code: lambda.Code.fromAsset("./lib/handlers"),

   });
Your updated stack file code should now look something like this:
import * as cdk from "aws-cdk-lib";

import { Construct } from "constructs";

import * as lambda from "aws-cdk-lib/aws-lambda";

export class MyCdkStack extends cdk.Stack {

 constructor(scope: Construct, id: string, props?: cdk.StackProps) {

   super(scope, id, props);

   const apiLambdaFunction = new lambda.Function(this, "ApiFunctionId", {

     runtime: lambda.Runtime.NODEJS_18_X,

     handler: "index.handler",

     code: lambda.Code.fromAsset("./lib/handlers"),

   });

 }
The next step is to create an API that will invoke this Lambda function, using this LambdaRestApi construct from the docs:
3. Import the construct as shown below
import * as apigateway from "aws-cdk-lib/aws-apigateway";
4. And create the API with the configuration shown below
   const api = new apigateway.LambdaRestApi(this, "MyApiId", {

     handler: apiLambdaFunction,

   });
This LambdaRestApi construct is a Lambda-backed API, and you may have noticed that the code snippet above defines the previously created ‘apiLambdaFunction’ as the API’s ‘handler’, so all requests will be processed by your handler function.
Now that you have your API and Lambda function configured, your stack file should resemble the following:
import * as cdk from "aws-cdk-lib";
import { Construct } from "constructs";
import * as lambda from "aws-cdk-lib/aws-lambda";
import * as apigateway from "aws-cdk-lib/aws-apigateway";


export class MyCdkStack extends cdk.Stack {
 constructor(scope: Construct, id: string, props?: cdk.StackProps) {
   super(scope, id, props);


   const apiLambdaFunction = new lambda.Function(this, "ApiFunctionId", {
     runtime: lambda.Runtime.NODEJS_18_X,
     handler: "index.handler",
     code: lambda.Code.fromAsset("./lib/handlers"),
   });


   const api = new apigateway.LambdaRestApi(this, "MyApiId", {
     handler: apiLambdaFunction,
   });
 }
}
Next, you need to create your handler. As you might have gathered from the combined inputs for the ‘code’ and ‘handler’ configuration in your ‘apiLambdaFunction’, when triggered, your script will seek a function named ‘handler’, sitting within an ‘index’ file, located within the directory ./lib/handlers.
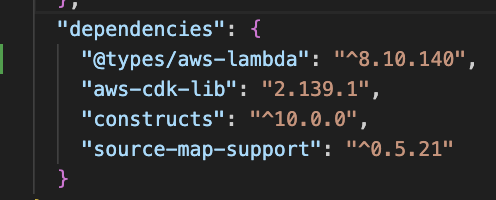
5. Before doing so, you’ll need to install the dependency for aws-lambda types for Typescript by running it’s npm install command at your project directory: Do so by traversing to the top level of your project in the CLI and entering via the terminal: npm i @types/aws-lambda
In your package.json where your project dependencies are configured, you will now see a ‘@types/aws-lambda’ entry within the dependencies object:
6. Next, add an index.ts file within the /lib/handlers directory by right-clicking on the ‘handlers’ folder and selecting ‘New file’
7. Populate your handler with the script below, which is simply designed to return a body with the httpMethod, path and a message confirming the successful request.
import { APIGatewayProxyEvent, APIGatewayProxyResult } from "aws-lambda";
export const handler = async (
 event: APIGatewayProxyEvent
): Promise<APIGatewayProxyResult> => {
 event;
 return {
   statusCode: 200,
   body: JSON.stringify({
     httpMethod: event.httpMethod,
     path: event.path,
     message: "Request received successfully",
   }),
 };
};
Deploying your stack
Now you are ready to build and deploy your stack:
1. In the terminal, at the project root directory run: npm run build
Since your CDK app is written in TypeScript (*.ts files), npm run build invokes the TypeScript compiler (tsc) to transpile TypeScript code into JavaScript. This step converts TypeScript code in lib/, bin/, or any other TypeScript source directory into JavaScript code, which is then executable.
Having executed that command, you will see that it has generated .js files from your .ts files.

Now you have compiled the script for your Lambda handler at ./lib/handler/index.js, you are ready to deploy.
2. Traverse to the root directory of your project via the terminal and run the following command to deploy the stack to your aws account: npm run cdk deploy
3. You will be asked: ‘Do you wish to deploy these changes (y/n)?’. Confirm ‘y’ to complete the deployment of the stack to your AWS account.
When the stack has successfully deployed you will receive confirmation via the terminal, as shown below:
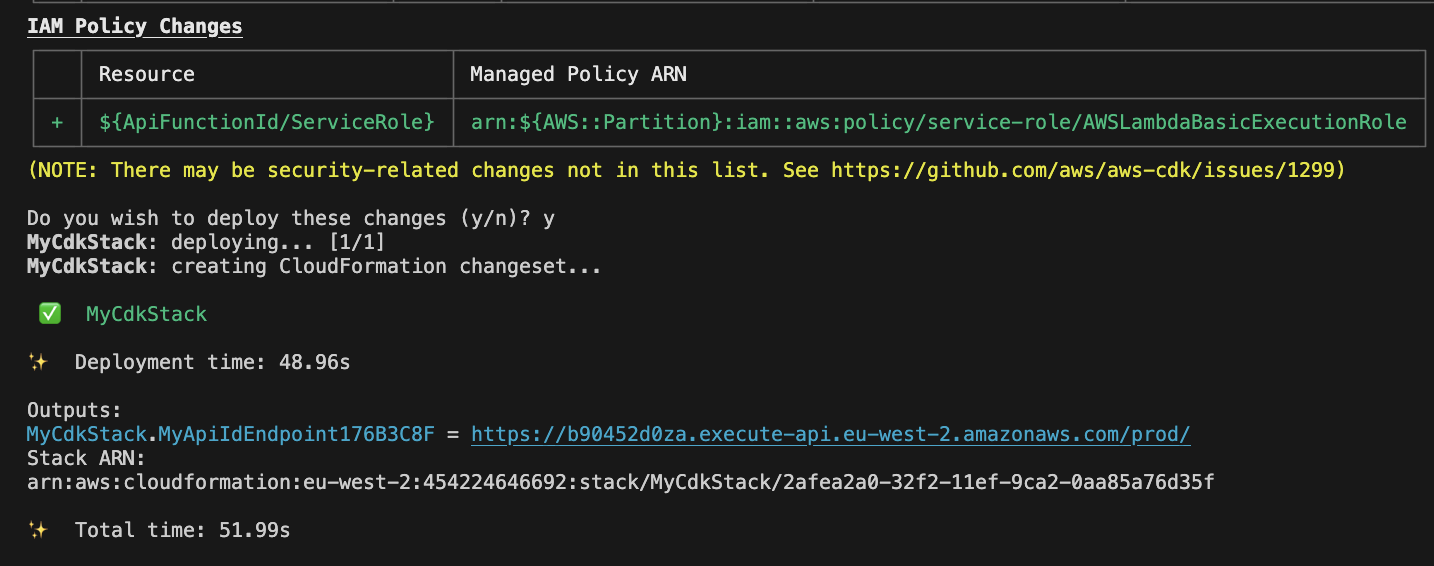
Testing your API and destroying your stack
Amongst the stack outputs above you will see the endpoint URL for your API. You can use this to test that your API is working correctly and returning the expected response from the Lambda.
1. Simply run the curl command followed by the API endpoint outputted by the AWS CLI, for example: curl https://your-execute-api.region.amazonaws.com/prod
![]()
2. Check the response returned via the terminal. You should see the result returned from the Lambda.
![]()
You can experiment with request methods and paths to see different results returned.
For example try:
curl -X POST https://your-execute-api.region.amazonaws.com/prod/new/path/
Congratulations! You have successfully built and deployed your first AWS CDK application.
When you no longer want to keep your stack and resources live, you can simply run the npm run cdk destroy command to delete the stack.
Contact our team and discover the cutting-edge technologies that will empower your business.

Talk to our experts!
contact us